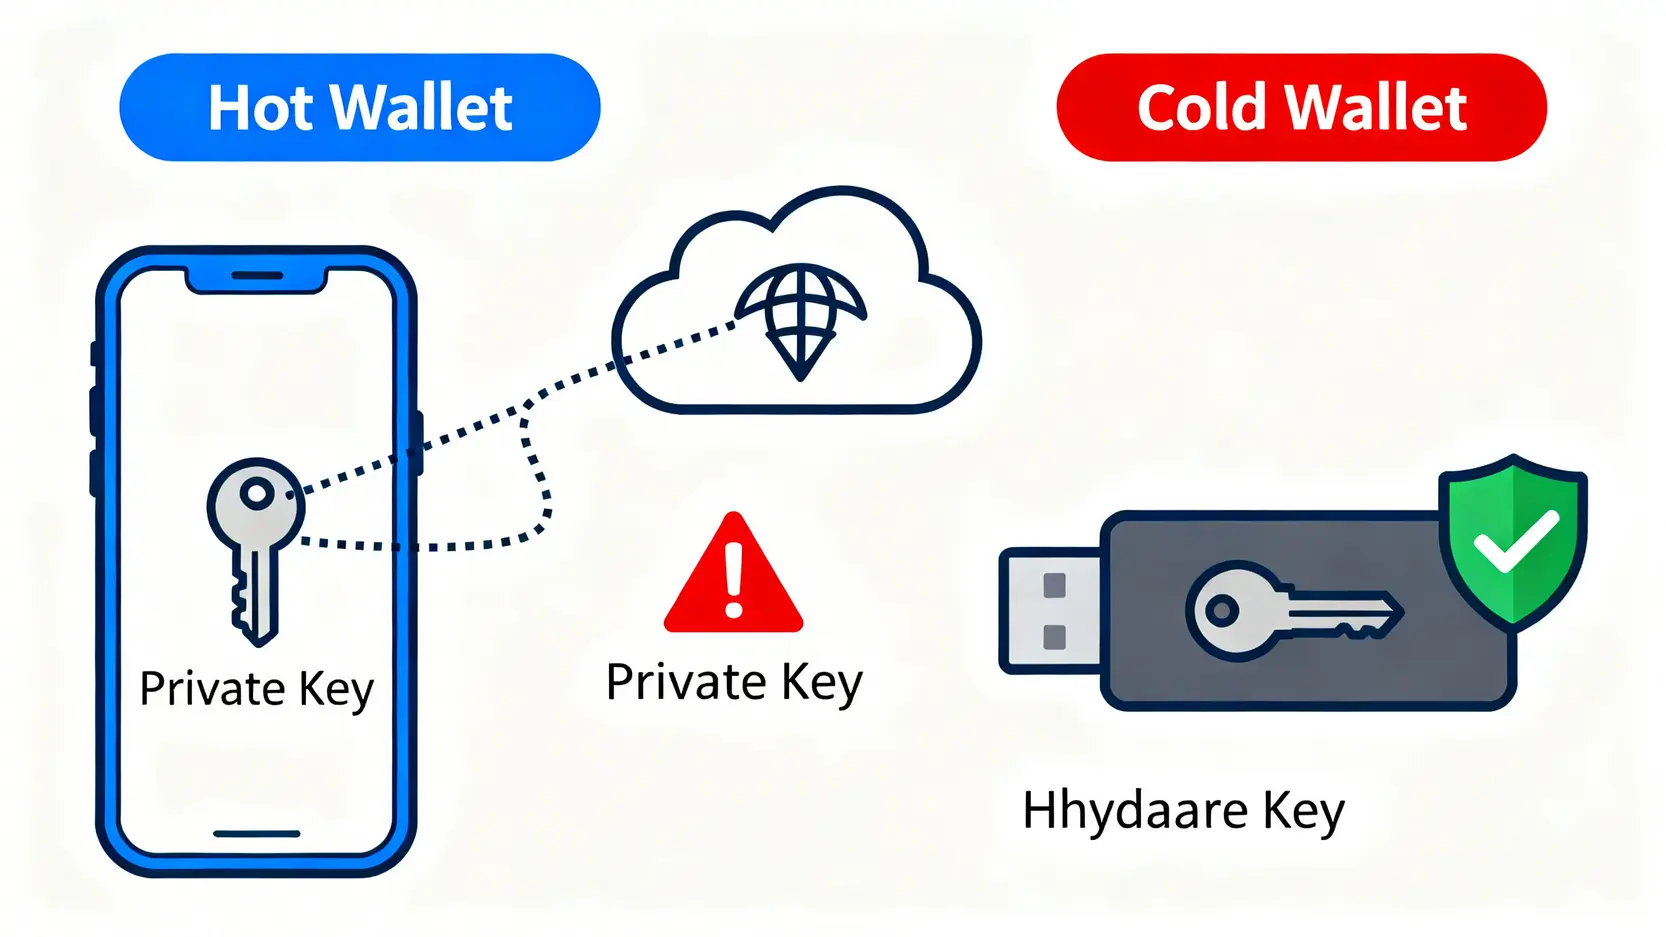
Cold Wallet Setup Guide: 5 Steps to Secure Crypto

Cold Wallet Tutorial: Complete Setup, Transfer, and Recovery Phrase Backup in 5 Steps (2026 Ultimate Guide)
In recent years, exchange collapses and hacking incidents have become increasingly common. Keeping cryptocurrencies in hot wallets or on exchanges carries growing risks. If you want true control over your digital assets, learning how to use a cold wallet is essential. This cold wallet tutorial starts from the basics, guiding you step by step through the setup process, teaching the correct usage methods, and breaking down the most critical part: “recovery phrase backup”. By following this guide, you can ensure your assets remain secure and avoid unnecessary risks. This is not just a tutorial, but a survival guide for navigating the crypto world.
Why You Need a Cold Wallet and the Key Difference From a Hot Wallet
Before learning how to use a cold wallet, it is important to understand the fundamental difference between cold wallets and hot wallets. Simply put, the biggest difference lies in “whether the private key ever touches the internet”. A private key is the only credential that allows you to access and move your crypto assets. Whoever controls the private key controls the assets.
Cold Wallet vs Hot Wallet: Security and Convenience Comparison
A hot wallet refers to any cryptocurrency wallet that connects to the internet, such as mobile apps or browser extensions. Their advantage is convenience, making them suitable for small and frequent transactions. However, because they are constantly connected online, they are also primary targets for hackers.
A cold wallet, also known as a hardware wallet, is a physical device that often resembles a USB drive. It stores your private keys inside a secure chip that remains offline. All transaction signing (authorization) occur within this offline environment. Only the signed transaction data is transmitted to the network, while the private key itself never leaves the device and is never exposed to a risky online environment.

| Features | Cold Wallet | Hot Wallet |
| Security | Extremely High (Private Keys Stored Offline) | Lower (Private Keys Stored on Internet-Connected Devices) |
| Convenience | Lower (Transactions Require Operating a Physical Device) | High (Transactions Can Be Made Anytime) |
| Asset Control | Full Control (User Holds the Private Key / Recovery Phrase) | User Controlled (Requires Proper Safekeeping of Device and Password) |
| Holding Cost | Requires Purchasing Hardware (Approximately Several Hundred to Several Thousand HKD) | Usually Free |
| Suitable Scenarios | Long-Term Storage, Large Assets, HODL | Daily Trading, Small Payments, Interaction With DApps |
Who Really Needs a Cold Wallet?
Although using a cold wallet requires an extra step, for the following types of investors it is absolutely a necessary investment:
- Long-Term Value Investors (HODLers): If you plan to hold major cryptocurrencies such as Bitcoin or Ethereum for the long term rather than trading frequently, a cold wallet provides the most reliable protection.
- Large Asset Holders: When the total value of your crypto assets exceeds an amount you cannot afford to lose (for example more than one month of salary), you should immediately transfer most of your assets into a cold wallet.
- Users Who Prioritize Security and Privacy: Investors who do not want their assets held by any third-party platform and want full control over their funds.
- NFT Collectors: High-value NFTs are also targets for hackers. Storing them in a cold wallet helps prevent phishing websites from stealing your valuable collections through malicious approvals.
Beginner Guide: Complete Cold Wallet Setup Steps
Next, we will walk through the complete cold wallet setup process using mainstream hardware wallets (such as Ledger or Trezor) as examples. Even though different brands exist, the core concepts and steps are very similar.
Step 1: Inspect the Package and Check Your Cold Wallet
After receiving a brand-new cold wallet, the first thing you should do is not plug it into your computer but carefully inspect the packaging!
- Check the Security Seal: Make sure the anti-tamper seal or shrink wrap is intact. If you notice any damage or signs of resealing, contact the seller immediately for a replacement.
- Confirm Package Contents: The package usually includes the hardware wallet device, a USB cable, a user manual, and several blank cards for writing down your recovery phrase.
- Never Buy Second-Hand: Do not purchase second-hand cold wallets. You cannot guarantee whether they have been tampered with. Always buy from the official website or authorized resellers.
Step 2: Initialize the Device and Set a PIN Code
After confirming everything is intact, connect the cold wallet to your computer. The device screen will turn on and guide you through the initialization process.
- Set Up as a New Device: Choose “Set up as new device” or a similar option.
- Set a PIN Code: Create a 4 to 8 digit PIN code. This password is required every time you use the device, similar to unlocking your phone. Choose a number combination that only you know and is difficult for others to guess. This PIN serves as the first line of protection for the device.
Step 3: The Most Important Step! Backup Your Recovery Phrase Correctly
This is the most critical step in the entire cold wallet setup process and is even more important than the PIN code. The device will display a sequence of 12, 18, or 24 English words on the screen. This is your “recovery phrase”.
Your recovery phrase is the “ultimate master key” to all your crypto assets. Anyone who obtains your recovery phrase can restore your wallet on any device and transfer all your funds. Conversely, even if your hardware wallet is lost, damaged, or stolen, you can restore all assets using this recovery phrase on a new device.
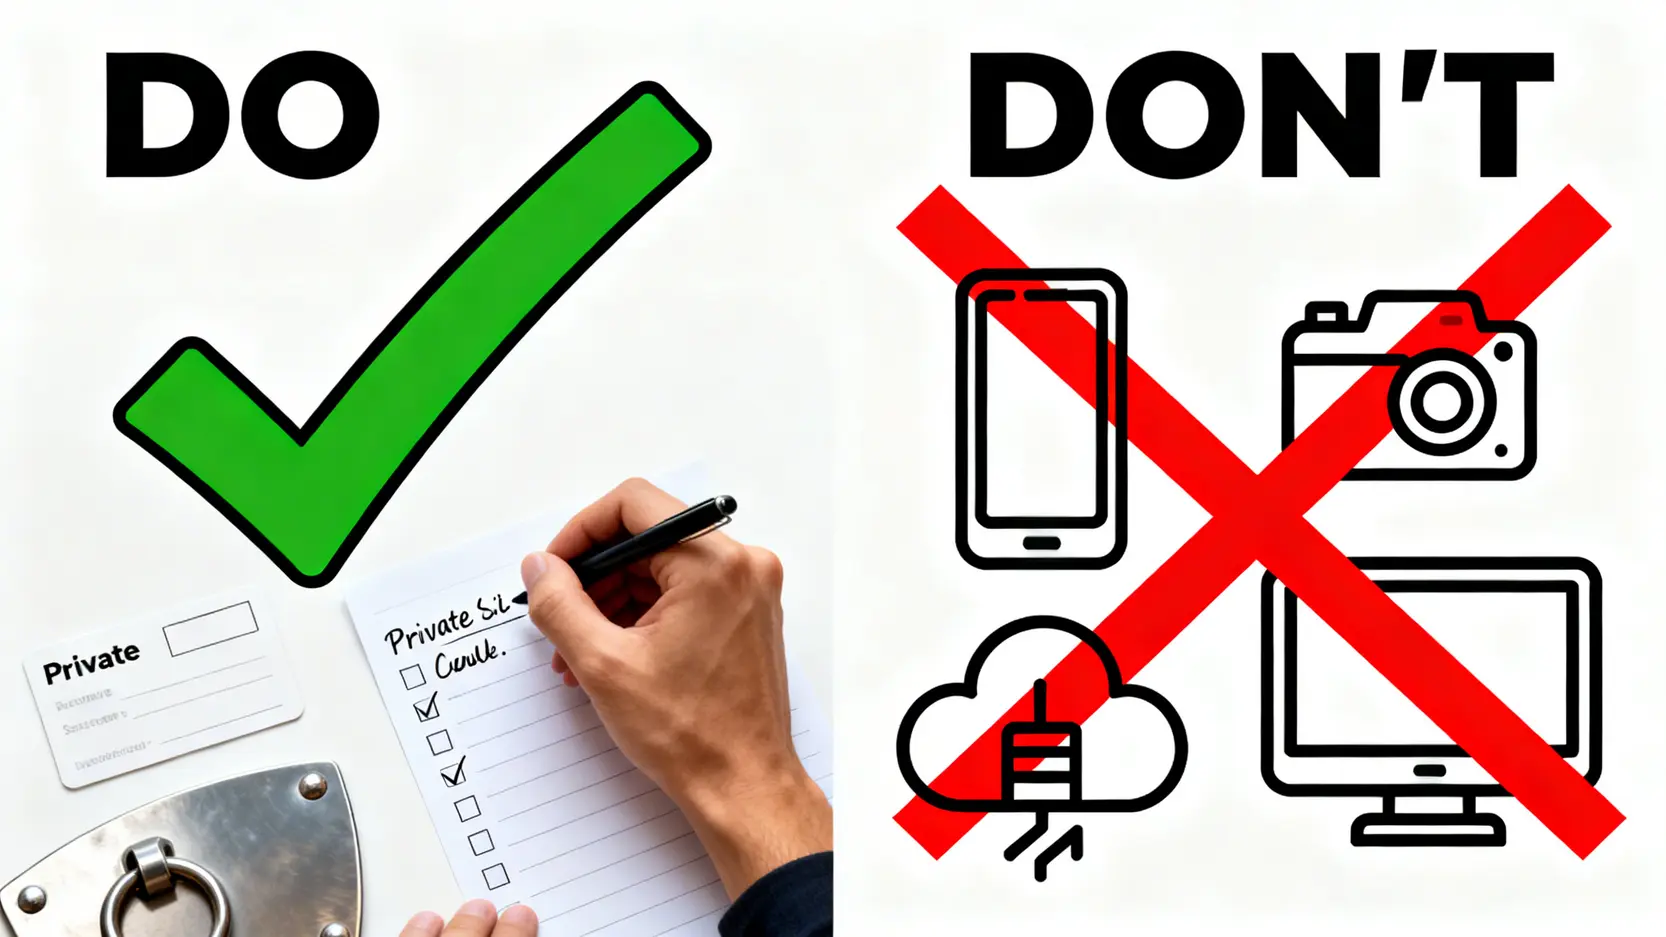
Backup Rules:
- Physical Writing: Take out the mnemonic phrase card included in the package and clearly write down each word in order using a ballpoint pen.
- Keep It Completely Offline: Never take photos, screenshots, or store the phrase on any internet-connected device (such as computers, phones, cloud storage, or email).
- Ensure Privacy During Backup: Write down the phrase in a private environment without cameras or other people present.
Step 4: Verify the Recovery Phrase
After writing down the phrase, the device will ask you to verify it to ensure the backup is correct. It may ask you to select words in order or enter specific positions in the phrase. This step prevents mistakes such as incorrect spelling or reversed order. Carefully complete the verification before proceeding.
Step 5: Install the Official Software and Connect the Wallet
Once the hardware setup is complete, download the official wallet management software from the brand’s website, such as Ledger Live for Ledger or Trezor Suite for Trezor. This software serves as the interface where you manage assets, generate receiving addresses, and initiate transactions.
- Download and install the software from the official website.
- Open the software and connect your hardware wallet following the instructions.
- The software will verify whether your device is genuine.
- After verification, you can add cryptocurrency accounts (such as BTC or ETH).
At this point, your cold wallet setup is complete!
Cold Wallet Usage Guide
After setting up the wallet, the next step is learning how to safely receive and send crypto assets. Every operation should be handled carefully.
How to Safely Receive Cryptocurrency?
Receiving crypto assets into a cold wallet is very safe because it only involves your “public address” and does not expose your private key.
- Open Ledger Live or Trezor Suite on your computer and select the cryptocurrency you want to receive (for example BTC).
- Click the “Receive” button.
- The software will display a public receiving address. The same address will also appear on the screen of your hardware wallet.
- Critical Step: Always verify that the address shown on your computer matches the address displayed on the hardware wallet. This prevents malware on your computer from replacing the address.
- Once confirmed, press the button on the hardware wallet to approve the address. You can now copy this address and provide it to others or withdraw crypto from an exchange to this address.
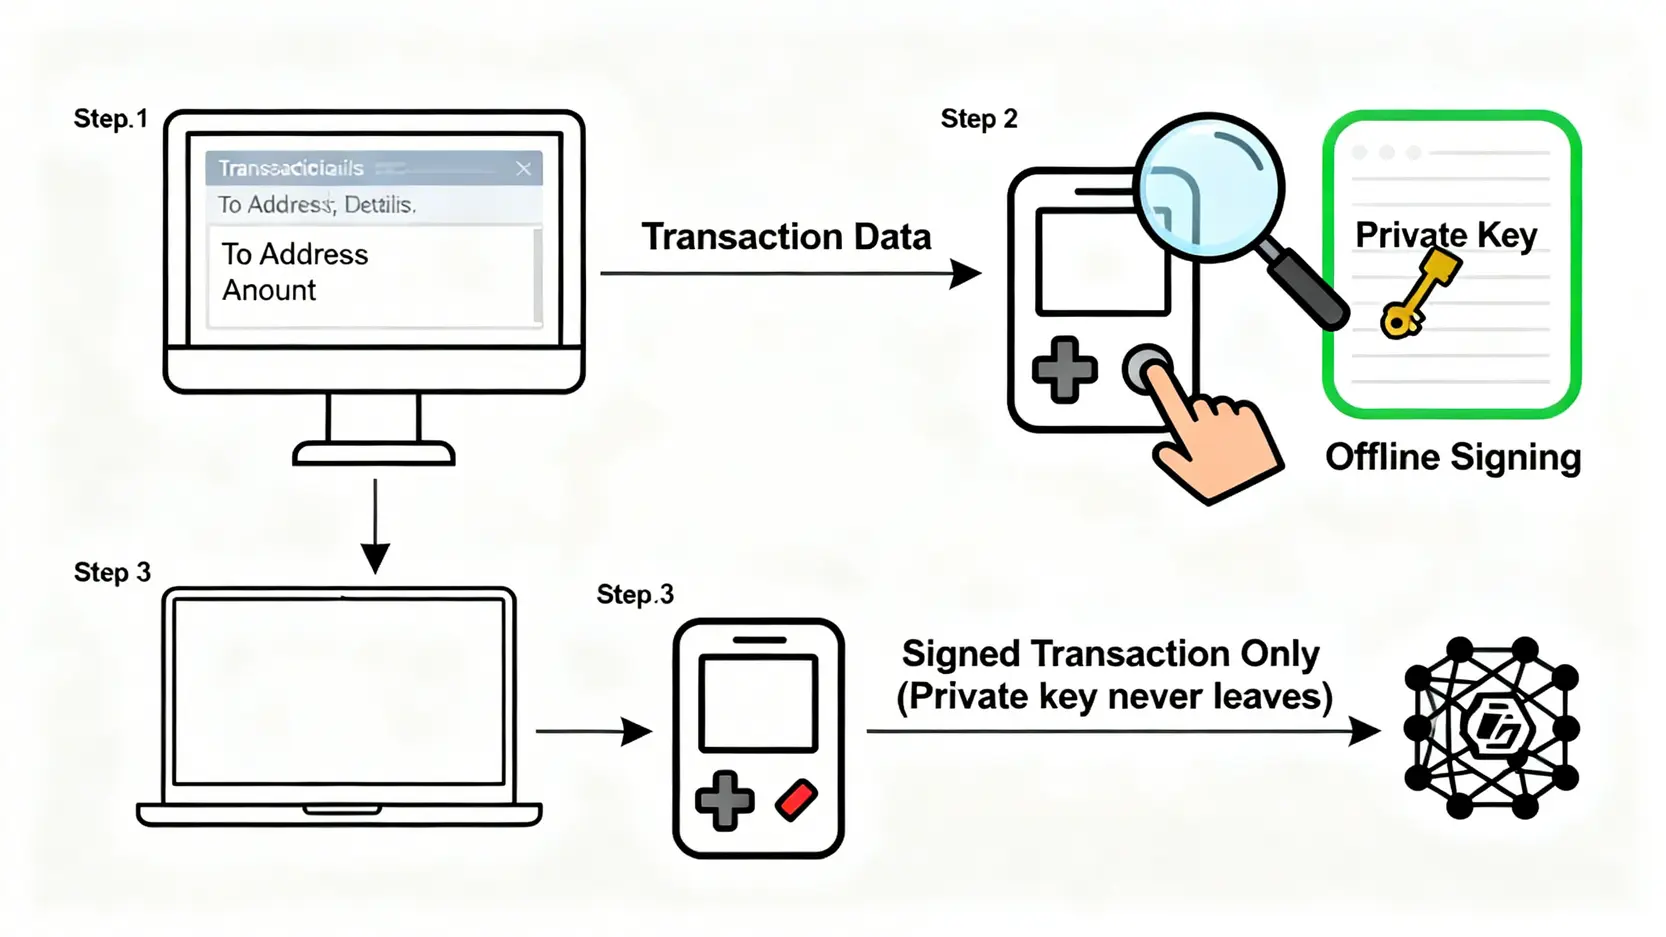
How to Send Cryptocurrency from a Cold Wallet? (Transaction Signing Process)
Sending crypto assets requires using your private key and is where the cold wallet provides its maximum security value.

- In the wallet management software, select the cryptocurrency you want to send and click “Send”.
- Enter the recipient address, amount, and network fee.
- Continue and the software will send the transaction details to your hardware wallet device.
- Critical Step: Carefully verify all transaction details on the hardware wallet screen, including the recipient address and amount.
- Once everything is correct, press the physical button on the device to “sign” or “approve” the transaction.
- After signing, the authorization data is sent back to the computer and broadcast to the blockchain network for confirmation.
Throughout the entire process, the private key remains inside the secure chip of the cold wallet and never leaves the device, ensuring maximum transaction security.
How to Transfer Assets From an Exchange to a Cold Wallet?
For most users, the most common scenario is withdrawing assets from an exchange to their own cold wallet. This process combines the “receiving” steps of a hardware wallet with the withdrawal function of an exchange. It is highly recommended that investors perform this action regularly to reduce reliance on centralized platforms.
- Step 1: Generate a Receiving Address on Your Cold Wallet:Follow the earlier instructions under “How to Safely Receive Cryptocurrency” to generate and verify a new receiving address on your cold wallet.
- Step 2: Log In to the Exchange and Select Withdrawal: Log in to your cryptocurrency exchange (such as Binance or Coinbase). Go to your asset wallet, select the cryptocurrency you want to transfer, and click “Withdraw”.
- Step 3: Fill in the Withdrawal Information: Paste the receiving address you copied from your cold wallet into the “withdrawal address” field. Carefully double-check the address because sending assets to the wrong address may result in permanent loss.
- Step 4: Choose the Correct Blockchain Network: This is one of the most common mistakes made by beginners! The withdrawal network must match the network supported by the receiving address (For example, ERC20 must correspond with ERC20, and BEP20 must correspond with BEP20). Choosing the wrong network can also result in permanent asset loss.
- Step 5: Enter the Amount and Complete Security Verification: Enter the amount you want to withdraw and complete the exchange’s required security verification steps (such as email confirmation, mobile verification, or Google Authenticator authentication).
- Step 6: Wait for Blockchain Confirmation: After submitting the withdrawal request, you will need to wait for the transaction to be confirmed on the blockchain by miners or validators. You can track the progress through a blockchain explorer. Once the transaction is confirmed, the new balance will appear in your cold wallet management software.
Ultimate Security: Best Practices for Recovery Phrase Backup
It must be emphasized again that the security of your recovery phrase is equivalent to the security of all your assets. Simply writing it on paper may not be enough. You should also consider extreme scenarios such as fire, water damage, paper deterioration, or memory loss.
Physical Backup vs Digital Backup
- Physical Backup (Recommended)
- Advantages: Completely offline and immune to network-based hacking attacks.
- Disadvantages: May be destroyed by physical disasters (such as fire or water) damage, or discovered by others.
- Examples: Writing on paper (basic), metal recovery phrase backup plates (advanced).
- Digital Backup (Strongly Not Recommended)
- Advantages: Easy to duplicate and access.
- Disadvantages: As long as the device has been connected to the internet, there is a risk of malware or viruses stealing the information, resulting in extremely low security.
- Examples: Text files, cloud storage, password managers, phone notes. These should be avoided whenever possible!

Avoid These Three Common Recovery Phrase Backup Mistakes
- Saving a Photo on Your Phone:This is extremely dangerous! Your photo gallery may automatically synchronize with cloud services (such as iCloud or Google Photos). If your cloud account is compromised, your recovery phrase could be exposed immediately.
- Storing It on a Computer or Cloud Storage: Saving the phrase in a text file on your desktop, an email draft, or any cloud service is equivalent to leaving the key to your vault in a public place that could be compromised at any time.
- Keeping the Backup Paper in the Same Location as the Device: If both the cold wallet and the recovery phrase are lost or stolen together, there will be no way to restore the assets. Always store the recovery phrase in a different secure location from the device itself.
Advanced Backup Tools and Methods
For investors with larger crypto holdings, stronger backup solutions are worth considering.
- Metal Recovery Phrase Backup Plates: There are specialized metal devices designed to store recovery phrases (such as Cryptosteel and Billfodl). These are typically made of stainless steel or titanium alloy, offering resistance to fire, water, and corrosion. They are considered the gold standard for recovery phrase backup.
- Distributed Backup: Create multiple copies of the recovery phrase and store them in separate secure physical locations (for example: one in a home safe and another in a bank safe deposit box).
- Advanced Passphrase Protection: Some hardware wallets support an additional “25th word”, known as a passphrase. This adds an extra password layer on top of your existing 24-word recovery phrase. Even if someone obtains your 24 words, they cannot access your funds without the passphrase. However, if you forget the passphrase yourself, the assets will be permanently inaccessible.
Cold Wallet Tutorial Frequently Asked Questions
What Should I Do If My Cold Wallet Device Is Lost or Damaged?
There is no need to worry. This is exactly why the recovery phrase exists. You simply need to purchase a new cold wallet (either from the same brand or another compatible brand). During initialization, choose “Restore from recovery phrase” and enter the 12 or 24 words you previously recorded. Your entire wallet and assets will be restored.
What Is the Difference Between a Recovery Phrase and a Private Key?
You can think of them as the “root” and the “branches” of a tree. The recovery phrase is the master seed generated by an algorithm and serves as the root for all private keys. A single recovery phrase can generate almost unlimited private keys and corresponding public addresses. By backing up the recovery phrase, you are essentially backing up the root instead of thousands of individual “branches”, greatly simplifying wallet management.
Which Cold Wallets Are Most Recommended for Beginners?
For beginners, the two most widely recognized and trusted brands are Ledger and Trezor. Their entry-level models, such as Ledger Nano S Plus or Trezor Model One, provide strong security, comprehensive features, and wide community support, making them excellent choices for first-time hardware wallet users.
Can a Cold Wallet Be Hacked?
The possibility of a cold wallet device being remotely hacked is extremely low because its core design relies on offline transaction signing. Most so-called “cold wallet hacks” occur because users mishandle their recovery phrases (such as storing them in cloud storage or entering them into phishing websites). Security ultimately depends on how carefully you protect your backup.
Do Cold Wallets Require Additional Fees?
Aside from the one-time cost of purchasing the hardware device, using a cold wallet does not involve any monthly or annual fees. The transaction fee (gas fee) you pay when sending cryptocurrency is the network fee required by the blockchain itself and goes to miners or validators. This fee is unrelated to the wallet brand and must be paid regardless of which wallet you use.
Conclusion
Mastering the correct setup and usage of a cold wallet is the foundation of protecting your cryptocurrency assets. It is also an essential step for progressing from a beginner to a more experienced investor. This tutorial covers the entire process, from choosing a device and setting it up to the most critical element, recovery phrase backup. Always remember that in the decentralized world, “Not your keys, not your coins”. Your asset security ultimately depends on you. Take action today and build the strongest possible protection for your digital wealth.
Related Articles
-
In-Depth Review of Intelligent Order Flow Detection Tools: Understanding Institutional Activity and Identifying Real Market Buying and Selling Pressure What Is Order Flow, and Why Is It a “Leading Indicator” for Price Prediction? Candlestick charts and technical indicators can be misleading, but the real-money "Order Flow" within the market cannot....2026 年 6 月 4 日
-
Social Sentiment Quantitative Indicators: Mining PTT and Dcard Discussions to Predict Stock Prices What Are Social Sentiment Quantitative Indicators, and Why Are They Becoming Increasingly Important? In an era of information overload, financial markets are no longer driven solely by cold financial statements and macroeconomic data. The "Shipping King" phenomenon...2026 年 6 月 4 日
-
Avoid Fraudulent Platforms! A Visual Guide to Taiwan FSC Licensed Futures Merchant Verification and Scam Prevention In recent years, driven by heightened volatility in global financial markets and the impact of monetary easing policies worldwide, more investors have begun seeking diversified investment instruments. However, underground futures operators and overseas fraudulent...2026 年 6 月 4 日


